Part 3
Medical Image Registration
Objectifs
- This part will help you understand what is the basics of image registration.
- The preoperative image and associated surgery planning data (such as the mask of the brain tissue) have to be registered to the brain data. This will result in finding the transformation that links the pre-operative image volume and the intra-operative image volume.
- The elastix software is used to perform the registration.
Exercices
Install the "Simple Elastix Registration" Action
CamiTK provides an specific extension that uses the elastix toolbox directly in order to offer simple image registration.
Elastix is an open source software, based on the well-known Insight Segmentation and Registration Toolkit (ITK or Insight Tool Kit). Elastix consists of a collection of algorithms that are commonly used to solve medical image registration problems.
Elastix provides two applications:
-
elastixis a program that computes a registration between a two images. It requires an input parameter file and an output directory (more about it later) -
transformixis a program that uses the resulting transformation computed byelastixto apply it to an input image. It requires an image, an input transformation file and an output directory (more about it later)
First you will need to install the CamiTK extension, then when you use the extension, you will need to specify the path to the elastix program.
The "Simple Elastix Registration" action generates the required elastix parameter files, launch the elastix program, and open the resulting registered image in CamiTK.
Please follow these installation steps:
- Step 1. Download the Windows extension archive.
-
Step 2. Unzip
simple-elastix-registration-win.zipanywhere you like (e.g., in yourDownloadsdirectory orC:\Temp). -
Step 3. Open
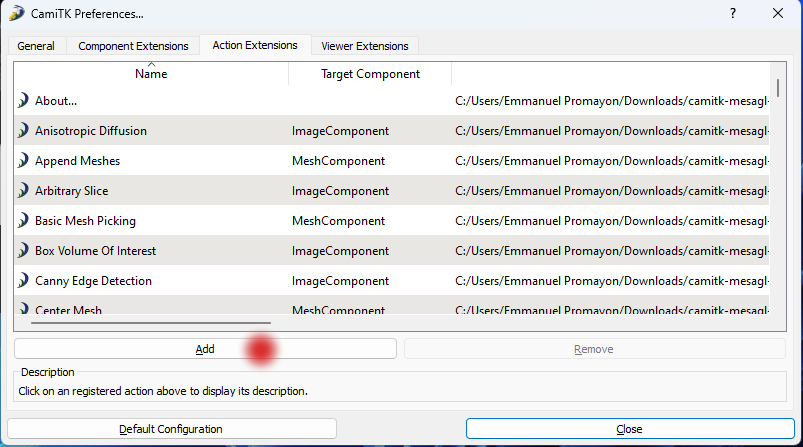
camitk-imp, and then open theEdit → Preferencesmenu or pressCtrl+P. -
Step 4. Open the
Action Extensionstab and click on theAddbutton:
|
-
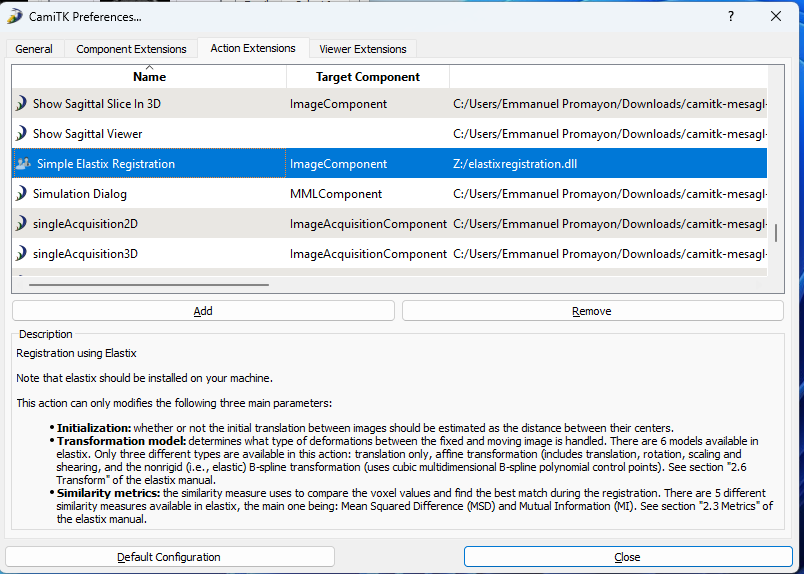
Step 5. Select the
elastixregistration.dllfile you just extracted. The "Simple Elastix Registration" action should now appear in the list, click on it to get its description:
|
-
Step 6. On Windows download the latest elastix software version corresponding to your OS from the official elastix github pages (you should also read the legal stuff). On Linux, install the official
elastixpackage. -
Step 7. Unzip the
elastix-5.1.0-win64.zipanywhere you like (e.g., in yourDownloadsdirectory orC:\Temp). - Step 8. On Windows, please make sure you have installed the latest supported version of the Microsoft Visual C++ Redistributable. Choose the one corresponding to your architecture (if you are on a laptop, it should be X64). Reboot after installation.
All set! You should be able to use elastix directly from CamiTK imp.
Objectives of this exercise
In this exercise, we will first artificially displace the T1 medical image volume by manually changing its position and orientation and then try to register it back to the initial non-displaced image.
In this case, the registration problem is simplified because we are trying to register an image to itself. As we are only going to modify the position and orientation of an image, the transformation we are looking for is rigid.
Simple Elastix Registration parameters
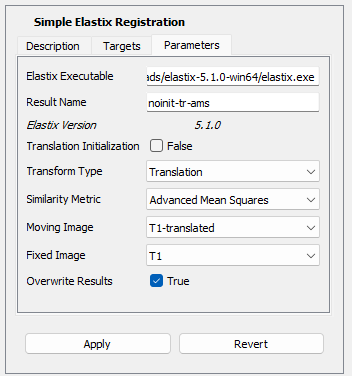
But first, lets check the parameters that can be modified in the Simple Elastix Registration action. Later on, when you will trigger the action, the parameters will look like this:
|
The following parameters are available:
- Translation Initialization: whether or not the initial translation between images should be estimated as the distance between their centers.
- Transform Type: determines what type of deformations between the fixed and moving image is handled. There are 6 models available in elastix. Only three different types are available in this action: translation only, affine transformation (includes translation, rotation, scaling and shearing), and the nonrigid (i.e., elastic) B-spline transformation (uses cubic multidimensional B-spline polynomial control points). For more information, see section "2.6 Transform" of the elastix manual for more information.
- Similarity Metric: the similarity measure that is used to compare the voxel values and find the best match during the registration. There are 5 different similarity measures available in elastix. Only four are available in this action: Advanced Mean Squares Difference, Advanced Normalized Correlation, Advanced Mutual Information and Normalized Mutual Information. See section "2.3 Metrics" of the elastix manual for more information.
During this tutorial, we are going to explore the effects of this three parameters. The CamiTK action also has the following parameters:
- Result Name: this is automatically deduced from the choice of the three elastix parameters explained above. This name will be given to the image computed by elastix. You may change it if you wish.
- Moving Image: this is the image that elastix will try to move/deform to match the fixed image.
- Fixed image: this is the target of the registration. Elastix is trying to compute a mapping from the fixed image to the moving image, i.e., ${}^{moving} T_{fixed}$.
- Overwrite Results: if checked, the action will overwrites the previous elastix results when the same registration is rerun.
Note that the moving and fixed image names are used to create a new folder that contains the image computed by elastix. For instance if your moving image is called m and your fixed image is called f, the resulting registrated image will be found in the subdirectory m-to-f.
Testing Registration with a Small Translation
First we will try registering the T1 image with a slightly translated version of itself.
T1.mhd and use the Frame Editor action (of the Frame family) to translate the image 100mm on the X axis by entering 100 in the X field of the Translation UI group, and then by clicking on the Translate button. The image should have moved in the 3D viewer.
File → Save As menu to save the rotated T1 image as T1-translated.mhd (make sure to enter the
.mhd
extension in the file dialog).
T1.mhd and T1-translated.mhd. You should be see both images in the 3D viewer.Simple Elastix Registration is triggered it might ask you to select the elastix executable on your computer. This is normal on Windows for instance. Just follow the instructions, it should end up with a message that states that elastix is functional.T1-translated back to T1. First select T1-translated and use the Simple Elastix Registration (of the Registration family). Then select the following parameters before applying the action:
| Parameter | Value |
|
|
|
|
|
|
|
|
|
|
|
|
|
|
|
Apply, open the integrated console to check the elastix output by clicking on the terminal icon at the bottom left corner of the application:

|
T1-translated-to-T1-noinit-tr-ams should be opened automatically. If the registration worked, it should be nearly undistinguishable from the original T1 image. To make sure close the T1-translated image and compare the value of the voxels (130,144,159) in both T1 and T1-translated-to-T1-noinit-tr-ams.
- The values are both 6553
- The values are both 4304
-
The value in
T1is 4304 and the value inT1-translated-to-T1-noinit-tr-amsis 6553
Simple Elastix Registration action automatically created a T1-translated-to-T1 subdirectory to save the elastix results: T1-translated-to-T1-noinit-tr-ams.mhd (the header of the registered image), T1-translated-to-T1-noinit-tr-ams.raw (the raw data of the registered image) and Transform-T1-translated-to-T1-noinit-tr-ams.txt which contains the computed transformation details.
Transform-T1-translated-to-T1-noinit-tr-ams.txt with a text editor and check the TransformParameters value (which in our case is the translation value as elastix was called with the Translation Transform Type).
- It is perfectly equals to the imposed translation
- It is not exactly equals, but very very close to the imposed translation
- It does indeed correspond to the transformation from the fixed image to the moving image (i.e. ${}^{moving} T_{fixed}$)
- It does indeed correspond to the transformation from the moving image to the fixed image (i.e. ${}^{fixed} T_{moving}$)
Testing Registration with small rotation
We will now try registering the T1 image with a slightly rotated version of itself.
T1.mhd and use the Frame Editor action to rotate the image 20° around the Y axis by entering 20 in the Around Y field of the Rotation UI group, and then by clicking on the Rotate button. The image should have moved in the 3D viewer.
File → Save As menu to save the rotated T1 image as T1-rotated.mhd (make sure to enter the
.mhd
extension in the file dialog).
T1.mhd and T1-rotated.mhd. You should be see both images in the 3D viewer.T1-rotated back to T1. First select T1-rotated and use the Simple Elastix Registration (of the Registration family). Then select the following parameters before applying the action:
| Parameter | Value |
|
|
|
|
|
|
|
|
|
|
|
|
|
|
|
T1-rotated-to-T1-noinit-tr-ams identical ot T1?
- Yes, the registration worked, both images looks exactly the same.
-
No,
T1-rotated-to-T1-noinit-tr-amshas not the same rotation. -
No,
T1-rotated-to-T1-noinit-tr-amshas some deformation.
Translation), and no rotation were minimized.
T1-rotated back to T1 again but this time set the Transform Type parameter to Affine. You can check that this time the proper registration was found by looking at the image at axial slice 160, coronal slice 130 and sagittal slice 130. In order to do so, set the slider values of the corresponding viewers by typing the slice indexes in the corresponding text fields on top of each slider.
T1-rotated, select the Frame Editor action. Now open the Transform-T1-rotated-to-T1-noinit-af-ams.txt in the T1-rotated-to-T1 subdirectory in a text editor. Compare the values in the Transformation Matrix panel of the Frame Editor action to the TransformParameters value in the text file.
- The rotation (first three columns) and translation (last column) are very similar
- The rotation (first three columns) is very similar
- The translation (last column) is very similar
- The rotation (first three columns) is different
- The translation (last column) is different
Make it fail
We will now apply a bigger rotation to T1 so that there is no overlap between the new and original image to see what elastix can do.
T1.mhd and use the Frame Editor action to rotate the image 90° around the Z axis, save it as T1-rotated-90.mhd, close all images, reopen T1.mhd and T1-rotated-90.mhd, select T1-rotated-90 and use the Simple Elastix Registration with the following parameters:
| Parameter | Value |
|
|
|
|
|
|
|
|
|
|
|
|
|
|
|
We choose the Affine Transform Type as we want elastix to also minimize a rotation.
- The application crashed
- Elastix failed to find a proper translation
-
The elastix log (visible in the application console) shows the error
Description: ITK ERROR: AdvancedMeanSquaresMetric(000001ED083BC1D0): Too many samples map outside moving image buffer: 0 / 300000. There are indeed no overlap between the two images and elastix can not find any fixed image samples in the volume of the moving image. -
The elastix log (visible in the application console) shows the error
Description: Maximum Number Of Iterations reached. The optimization process reached the maximum number of iterations, elastix decided to therefore stop the minimization.
Frame Editor to translate T1-rotated-90 by -100 mm in the Y direction (T1-rotated-90 and T1 should now overlap in the 3D viewer). Restart the registration using the same parameters.
Does elastix failed ? What do you think of the results?
Translation Initialization parameter to True. Restart the registration using the same parameters.
What do you think of the results compared to the previous one obtained in the previous question?
And succeed again
T1-rotated-translated image from T1 that combined a 45° rotation around Y and 100 mm translation along the X axis. Try registering T1-rotated-translated to T1 using the same parameters as in the previous test (Translation Initialization set to True, Affine Transform Type and Advanced Mean Squares metric). What do you think of the results?
To take away. This little tests should shows that:
- Registration algorithms need, like any optimization algorithm, a good initialization. A classical registration process always starts by a coarse initial registration (e.g., moving the center of both images at the same coordinates).
- Registration can be difficult to obtained when the image difference is too high. Even in our case, when the similarity metric should have no problem measuring corresponding voxel values, as we tried to register an image to itself, i.e., images that have the exact same values.
The initialization of any surgical navigation systems has therefore to be done very carefully and focus on getting a first approximation as close as possible to the target (for instance using fiducial or acquiring the position of landmarks with a localizer).
Now we understand the basics of registration, lets try to use it to register something more useful in the case of the brain shift application.
In the registration directory, you will find another image: FLAIR_perop.mhd. We will consider that this image is acquired using
an intra-operative MRI after the surgeon opened the skull to get access to the tumor.
In fact this image was produced by a biomechanical model that simulate the brain shift (see [Morin2017] this paper for more information). We will use FLAIR_perop.mhd to simulate an intra-operative image.
As shown in the previous exercise, the registration will only converge if the image are not too far from each other. In this exercise, we consider that a first registration was done in order to pre-register the intra-operative image FLAIR_perop.mhd to the pre-operative image FLAIR.mhd
FLAIR_perop.mhd image and FLAIR.mhd to check the difference in pose in the 3D view.
Note that the FLAIR_perop.mhd image contains the whole head of the patient (there is no black areas at the bottom of the head and front of the face).
160, the coronal view (bottom left) to slice 130 and the sagittal view (bottom right) to slice 130. Now click back and forth to the two images in the explorer. You should be able to visualize the deformation.
Initial affine registration
We are first going to register the two images using affine registration. The translation initialization should not be required here as the images were pre-registered.
From now on, we will consider that FLAIR_perop.mhd is the fixed image, and that FLAIR.mhd is the moving image. The image resulting from the registration is therefore going to be a transformed FLAIR.mhd that match a much as possible (and depending on the parameter we use) the intra-operative image FLAIR_perop.mhd.
We will now use the following parameters:
Simple Elastix Registration with the following parameter:
| Parameter | Value |
|
|
|
|
|
|
|
|
|
|
|
|
|
|
|
160, the coronal slice to 130 and the sagittal slice to 130). What do you observe?
Changing metric
As you can see, the registration is not perfect:
- There is of course no deformation as the transform model is set to affine.
- By trying to register all the data, the minimization process of the affine transform model resulted in a scaling perturbation
We are now going to check the effect of the choice of a metric, and change from Mean Square Deviation to Mutual Information.
Simple Elastix Registration with the following parameter:
| Parameter | Value |
|
|
|
|
|
|
|
|
|
|
|
|
|
|
|
160, the coronal slice to 130 and the sagittal slice to 130). What do you observe?
Using elastic registration
Lets try now to find the deformation component. For that we need to change the transform type to an elastic transform model. We are going to use a B-spline transformation.
Simple Elastix Registration with the following parameter:
| Parameter | Value |
|
|
|
|
|
|
|
|
|
|
|
|
|
|
|
160, the coronal slice to 130 and the sagittal slice to 130). What do you observe?
If you open the Transform-FLAIR-to-FLAIR_perop-noinit-b_-nmi.txt file you will notice that this time the TransformParameters is a huge matrix. In fact this is the matrix containing the 3D displacements of all the B-Spline control points. The number of control points used by elastix can is defined by the GridSize parameters. So for instance if the GridSize is $27x35x35$, the number of values in TransformParameters is $27x35x35x3 = 99 925$
Registering the pre-operative mask
Now that we have found a correct elastic registration, we are going to use it to deform the brain mask segmented on the pre-operative image.
This is an important step in build a navigation system. Using the transformation found by the elastic registration algorithm, we will be able to transfer all the planning the surgeon has done in the pre-operative images into the intra-operative space.
In the previous part of this tutorial, we have produced a mask of the brain tissue and a mesh to represent it in 3D. There could be other pre-processing stage done on the pre-operative image, when time is not as crucial as during the operation. For instance, another mask could have been segmented on the pre-operative images in order to delimit the brain contour (including for instance a security margin). Or the brain tissue mask could have been register to a complex brain atlas in order to label all the tissues and areas of the brain.
The per-operative segmentation is an important step and allows the surgeon to define her/his planning (e.g., planning to resect of the tumoral tissues). Unfortunately, as soon as the skull is opened to get access to the tumor, brain-shift phenomenon means that the tumor is not at the place it was relatively to the skull in the pre-operative images. All the pre-operative planning information have to be registered as well to the per-operative space.
This is basically what we are going to do in this exercise by using the previously found elastic registration transformation on the pre-operative segmented mask.
In order to apply a transformation, we are now going to use transformix, the second application provided by the elastix software.
We will now consider the following inputs:
- the mask mhd image file (called
FLAIR_mask.mhdin the remaining of this exercise) - the transformation file, produced by elastix. If you did not modify the default result name parameter, this file should be called
Transform-FLAIR-to-FLAIR_perop-noinit-b_-nmi.txton your computer.
Transform-FLAIR-to-FLAIR_perop-noinit-b_-nmi.txt
FLAIR_mask.mhd and FLAIR_mask.raw files, and create a subdirectory called transformed-mask and type the following line in the terminal:
transformix -in FLAIR_mask.mhd -tp Transform-FLAIR-to-FLAIR_perop-noinit-b_-nmi.txt -out transformed-mask
transformed-mask subdirectory and be called result.mhd. What do you observe?
Refine the registration using the deformed mask as the ROI
Another very useful thing that we can do using the registered mask is to use it to define a Region Of Interest for the registration algorithm. Instead of asking the whole image as the input for registration algorithm, we can now perform a second registration step and ask it to only focus on the region defined by the mask. This will produce a better registration of the brain tissue (but as you will see, it might produce an alien skull!)
To give the mask to the elastix application, we are now going to directly use the elastix binary on the command line. This means that we will first have to manually create a new subdirectory for elastix to write its results.
using-ROI in the elastix software subdirectory, and copy the FLAIR_perop.mhd and FLAIR_perop.raw files, and save the bspline-mi.txt (the elastix parameter file used in the previous exercise).
elastix and specify the ROI using the deformed mask by typing the following command in the terminal:
elastix -f FLAIR_perop.mhd -m FLAIR.mhd -fMask transformed-mask/result.mhd -p bspline-mi.txt -out using-ROI
The fMash parameter specifies the binary image to use as a fixed image ROI. This means that the registration optimization is limited to use only the voxels that have a value of 255 in the mask. The other voxels are not taken into account during the registration.
using-ROI/result.0.mhd) and without using a ROI. What do you observe?